- You are here:
- Home »
- Blog »
- Dive Deeper »
- How To Use Freediving Tables: Your Guide to Breath-hold Training
How To Use Freediving Tables: Your Guide to Breath-hold Training

If you’re looking for an easy way to reliably lengthen your breath-hold; then training with freediving tables is probably your best bet.
They’re easy-to-use, require minimal setup and they make it very simple to track your progress as you improve your breath-hold.
What are freediving tables?
Freediving tables, also known as apnea tables, are charts used as reference points to help with breath-hold training. Freediving tables can be used to increase your breath-hold, by helping your mind and body adapt to low levels of oxygen and high levels of carbon dioxide.
Freediving tables carry the pronounced benefit of not requiring you to actually practice freediving in order to increase breath-hold times.
In addition, they can be practiced alone (unless you do wet static apnea) and are safe exercises as long as you use them while laying on dry ground.
It’s important to note that although apnea tables are a handy exercise, they are no silver bullet. Breath-hold training takes time, effort and patience.
O2 & CO2 tables
Before moving on, lets discuss what the two different types of freediving tables are.
CO2 (carbon dioxide) tables
Despite what most people think, the urge to breathe does not stem from oxygen deprivation. Rather, it’s the buildup of CO2 in your bloodstream that gives you an almost overwhelming urge to breathe.
CO2 tables force your body build tolerance to high CO2 levels in your blood. Overtime, and with enough training, you can reliably boost your breath-hold times by learning to cope with the uncomfortable sensations of high CO2 levels (the overwhelming urge to breathe, diaphragm contractions and corresponding discomfort/panic).
How to use CO2 tables
CO2 tables (carbon dioxide tables) are your guide to knowing know how long to hold your breath for vs how long to rest for between breath-holds.
CO2 tables have a structured series of breath-holds that are all the same length in duration.
Then between each series of breath-holds, you’re allowed to breathe for a certain amount of time.
The further you go down the table; the less time you’re allowed to breathe between each series of breath-holds.
Training breath-holds in this pattern temporarily raises CO2 levels in your blood, creating a safe environment to build CO2 tolerance.
Only practice CO2 tables 2-3 times per week. Never practice on the same day as an O2 table practice.
Below is a CO2 Table example:
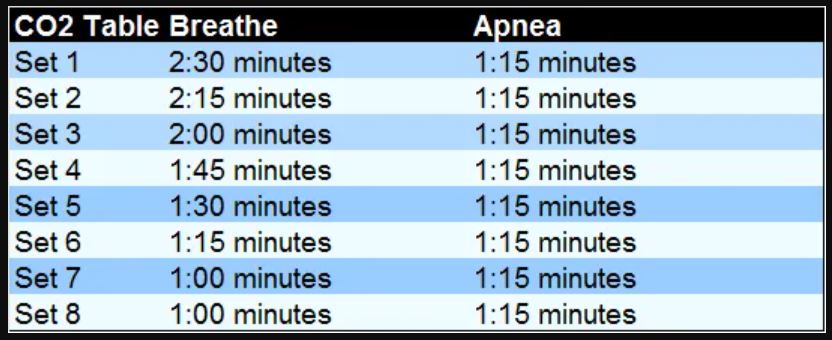
This CO2 Table has a hypothetical personal best breath-hold time of 2 minutes and 30 seconds.
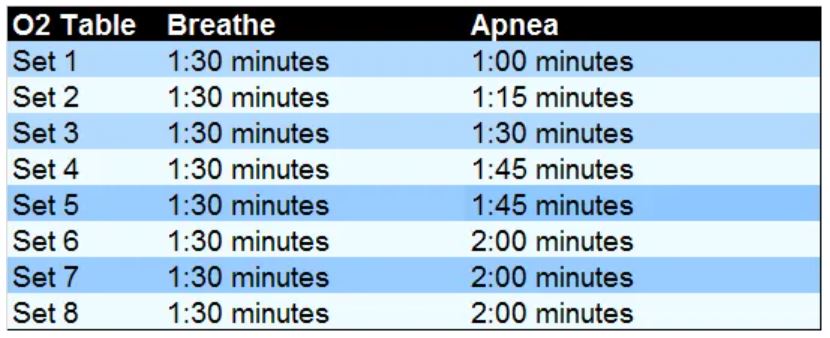
O2 (oxygen) tables
O2/Oxygen tables are used by freedivers to help them learn to operate efficiently and effectively when low on oxygen.
If you can train your body to use less oxygen to undertake the same movements and functions, you become a more efficient freediver, leading to deeper dives.
Similar to CO2 tables; O2 tables have 8 sets of apnea with rest time in between each apnea session. The main difference between O2 tables when compared to CO2 tables, is that rest times during O2 tables stay the same, while the time you hold your breath increases after each set.
We like to increase the apnea time after each set, because it slowly drains your body of O2, which is a form of Hypoxic training.
And remember, with O2 tables a general guideline is that the length of your last breath-hold in the O2 table, should not be more than 80% of your record apnea time.
Only practice O2 tables 2-3 times per week. Never practice on the same day as a CO2 table practice.
Benefits of static apnea tables
Static breath-hold training will assist with:
• Encouraging the body to tolerate high levels of CO2
• Training our bodies to handle low levels of oxygen (hypoxia)
• Diaphragm contractions
• Mental conditioning and discipline
• Deeper dives & longer breath-hold times
Pro Tips:
• Pace yourself! There’s no reason why you have to come out of the gate guns blazing and shatter all your records at once. It’s all about consistency.
• You have just one breath. So, breathe slowly. Really! Slow exhale, slow inhale. Take a few seconds for each. It will feel much better than breathing in and out quickly.
• If possible, have an experienced buddy talk you through the tables.
• After every breath-hold table, recover properly!
• Always practice dry static apnea laying down. Sitting or standing while practicing can be risky. You could faint, pass out and hit your head/injure yourself.
Another Technique for Dry Apnea Training:
Molchanovs Movement | Stay-at-Home Dry Apnea with Alexey Molchanov | Molchanovs Freediving
Some Freediving Apnea Phone Apps:
• STAmina: iPhone / Android / Windows – $4.99 on iPhone / $2.99 on Android / free on Windows
• Freediving Apnea Trainer: iPhone / Android – Free
• Prana Breath: Android – Free
• Freedive: Supports – Android
With CO2 and O2 tables, remember to not push yourself too far. Keep them at a level that is challenging yet easy so you can succeed every time.
Embrace your contractions!

Why Is Freediving So Popular?
Download our FREE eBook guide and discover why freediving is so popular and how to get started!
About the Author Gerrie van Niekerk - Apnealogy
Gerrie is a passionate Freediver, Spearfisher, Digital Marketer, and author for the Apnealogy website. Gerrie is an SSI Level 1 certified Freediver who loves geeking out about freediving and spearfishing gear and lives for his family and adventure.