- You are here:
- Home »
- Blog »
- Dive Deeper »
- How To Freedive Deeper (a short guide)
How To Freedive Deeper (a short guide)

Knowing the fundamentals on how to freedive deeper could save you weeks, months or even years of spinning your wheels practicing the wrong things and never really hitting your full potential as a freediver.
In this post I’m going to show you the best exercises you can practice daily and/or weekly, to help you freedive deeper.
Knowing exactly how to freedive deeper can help shortcut your learning curve as a freediver.
This short guide focuses on two main elements for deeper freediving:
1) Breath-holding: Exercises to increase your total breath-hold time so you can freedive deeper, and;
2) Relaxation: Tips & tricks to staying calm and confident underwater, because panic & fear are your biggest enemies when trying to dive deeply.
Who is this guide for & what results can you expect?
By following the exercises laid out in this guide – and also tinkering them to suit your body & personal diving habits…
You may be able to freedive about 110 feet or more in a matter of months, with a breath-hold time between 4 – 5 minutes or more.
However, there are of course, other things that can help you freedive deeper that don’t include breath-hold times & relaxation.
Factors like your experience, finning technique, diet, fin type & more, all work toward deeper freediving.
However, adding that stuff into this guide is going to make it a little too long. So, I’ve added a resources area at the end of this guide, for you to read through additional deep-diving content.
Please note: This is not medical advice, I am not a doctor nor am I a professional freediving instructor.
If something seems unsafe to you, or your freediving instructor gave advice contradicting what you’re about to read; then do what you / your doctor and/or your freediving instructor thinks is safest.
You are responsible for your own safety in the water. Never train in the water or freedive without a qualified freediving buddy watching you.
With the warnings out of the way, let’s get into how you can freedive deeper than 110 feet+ in just a few months of practicing.
This guide will start with exercises you can use to boost your breath-hold times for deeper freediving.
Then we will cover relaxation for deeper freediving, followed by recommended resources & gear.
How to freedive deeper: Boosting Your Breath-hold times
As you know, one of the most important things contributing to freediving deeply, is your ability to hold your breath for long periods of time.
Without mastering your breath-holds; it won’t matter how good your freediving gear is, how fast you fin or which equalization technique you use.
You have to learn the secrets of how to hold your breath for long periods of time, if you ever want to hit your full potential as a freediver…
And dive very, very deep. 😉
Patience & discipline are vital.
Freediving deeper requires discipline, patience and consistency.
The 3 Pillars of Breath-holding
Learning how to hold your breath for a long time, always comes down to practicing 1 or more of the 3 ‘Pillars’ of breath-holding.
The 3 Pillars of Breath-holding are:
- 1) General Breathing Ability
- 2) Carbon Dioxide Threshold
- 3) Hypoxic Threshold
Each breath-holding exercise you’ve heard of, trains at least 1 or more of these 3 Pillars.
Your goal as a freediver, is to train these Pillars so you increase their respective Thresholds.
Let’s take a closer look at each Pillar of Breath-holding:
Pillar 1 of Breath-Holding For Freediving Deeper: Your General Breathing Ability
Before we begin this section, let me start by saying everyone has different genes and body types leading to different starting points for how well your lungs function.
Due to this variance in lung function; everyone also has different starting points in how well and developed their general breathing abilities are.
Some of you naturally have nice big lungs…some of you have smaller lungs.
Some of you may be elite track athletes…while some of you may have smoked a pack a day for 20 years.
But the good news is that it doesn’t really matter where you start off.
With practice & discipline, as well as the correct breathing techniques; most of you can maximize your breath-holds and freedive 110 feet+ within months of trying.
Side note: Many freedivers are severely limited in how deep they can freedive, because they use the wrong equalization technique.
Although it may feel like you’re doing the Frenzel Method, you may actually be doing the Valsalva Method which is not safe long-term and will severely limit your freediving depth. I recommend partaking in this course here, to learn exactly how to equalize your ears during deep freediving.
Exercises to boost your General Breathing Ability
There are 3 main things contributing to your General Breathing Ability as a freediver: Consistent abdominal breathing, using an air-restriction device daily & Pranayama Yoga.
Lets look at each one more closely, starting with the most important one:
Abdominal Breathing
Abdominal breathing, diaphragmatic breathing and belly-breathing all refer to the same thing:
Breathing in through your nose so that your belly (stomach) and entire abdominal cavity expands first. After that your chest fills up with air, and then you exhale through your mouth.
Sounds simple right?
That’s because it is! 🙂
But funnily enough, the vast majority of people don’t do abdominal breathing, they do chest breathing.
Chest breathing: is when you inhale rapidly and quite shallowly into the top portion of your lungs. This lowers your body’s ability to absorb oxygen into your blood stream; leading to more subsequent breaths needed to keep your body running (and a shorter breath-hold time).
You’d be surprised how many freedivers think they are breathing deeply into their abdomen during their pre-dive breathe-up…but are actually just doing a deeper version of their normal chest-breathing.
Not knowing how to breathe into your abdomen is something that kills many freedivers’ total breath-hold times.
If you don’t master abdominal breathing, your ability to freedive deeply will be handicapped before you even get into the water.
So how does abdominal breathing lead to deeper freedives?
Abdominal breathing boosts your breathing efficiency so your body gets more oxygen for less work. It also releases more carbon dioxide from your body when you exhale, increasing your starting CO2 threshold.
If you practice abdominal breathing enough, it will turn into a habit where you breathe into your belly throughout each and every day…without even realising it or trying. All this contributes to better pre-dive breathe-ups for deeper freediving.
Outside of freediving, abdominal breathing has also been proven to lower your heart-rate, decrease blood pressure and help make you a more relaxed person.
In many cases, freedivers don’t do abdominal breathing correctly, because they use a nylon weight belt that cuts off their abdominal cavity from expanding fully. Don’t know how nylon weight-belts kill your pre-dive breathe-up? Curious what material weight belt you should be using instead? Read my post about it by clicking this link here.Here’s a simple video teaching you where exactly your diaphragm is while also teaching you a good way to practice abdominal breathing:
I recommend skipping to 00:53, to see the standing breathing exercise.
The standing breathing exercise is best, because you can do it throughout the day – eg: while waiting in line at an ATM, at the shops etc.
Video credit goes to Youtube Channel ‘Nemours‘.
Steps outlined in video:
Step 1: Stand with your back straight.
Step 2: Place one hand on your chest and one hand on your belly.
Step 3: Breathe in slowly through your nose and feel your belly rise.
Step 4: Breathe out through your mouth and feel your belly flatten.
While doing the above steps, try to keep the hand on your chest as still as possible.
Step 5: Repeat for 10 breaths.
This is a great starting exercise that ingrains abdominal breathing into your subconscious and muscle memory, so you start doing it throughout the day and before dives.
How many times a week should freedivers do this exercise? 2 – 4 times per day. It only takes about 2 minutes each time.
After doing this for about a month, you should notice your pre-dive breathe-up has become much more relaxed and deeper, leading to longer breath-hold times for deeper freediving.
Air Restriction Devices
Another way to reliably boost your general breathing ability, is to train your lungs with an Air Restriction Device (ARD).
Air Restriction Devices work by limiting the amount of air you inhale and exhale. This extra resistance can strengthen your lungs, boost lung capacity, increase your CO2 Threshold and boosts your overall breath-holding capability.
I’ve written a post here teaching you exactly how to use an Air Restriction Device so you can boost your lung capacity for longer, more comfortable breath-holds when freediving.
For best results use an ARD twice a day, every day of the week.
If you don’t use an ARD; you’re missing out on an easy, highly-accessible way to boost lung capacity from the comfort of your own home.
It takes discipline, but it’s worth it and can be fundamental to training your lungs for freediving deeper.
Pranayama Yoga
There are many branches of yoga and all of them can increase your breathing ability for freediving by promoting efficient oxygen consumption.
However, I believe that above all else, Pranayama Yoga – the yoga discipline that deals specifically with breath & relaxation – is the most useful for increasing your breath-hold time & diving deeply.
Pranayama Yoga teaches freedivers how to breathe calmly, deeply and efficiently.
There’s many different techniques, but I suggest starting with this video of Adham Pranayama here.
(Video credit: goes to Youtube Channel ‘Do Yoga With Me’. You can check out their website here.)
Adham Pranayama conditions your mind and body to breathe deeply using your diaphragm, leading to deeper inhalation during pre-dive breathe-ups. It can also lead to increased control & regulation over breathing & boosted relaxation during apnea.
It’s best to practice this exercise 2 – 3 times per week, for 10 – 15 minutes per session.
Now that you’ve got everything to get your General Breathing Ability on track (Pillar 1 of Breath-Holding), let’s take a look at Pillar 2:
Pillar 2 of Breath-Holding For Freediving Deeper: Boosting Carbon Dioxide Threshold
When you inhale air, your body uses the oxygen in your lungs to make energy.
This leaves carbon dioxide (CO2) as a waste product.
The longer your hold your breath, the more your body will convert all the oxygen in your lungs into CO2.
This then causes the total carbon dioxide level in your blood to rise, which is detected by CO2 receptors scattered throughout your body.
Once your CO2 receptors notice there is too much carbon dioxide in your bloodstream, they signal to your brain that you have to breathe.
It is important to note: the urge to breathe is NOT stimulated by lack of oxygen. The urge to breathe is stimulated by rising levels of carbon dioxide in your blood.
High levels of Carbon Dioxide in your blood, not lack of oxygen, is what makes you feel the urge to breathe.
As the CO2 levels in your blood rise, the urge to breathe grows stronger.
You also start getting diaphragm contractions, which is when your chest starts jolting up and down. This is your body’s way of reminding you that you need to breathe.
Although the urge to breathe is signalling to you that you’re probably running out of oxygen; experienced freedivers recognize it is just a warning and know they also still have plenty of oxygen left to complete their dive.
One of your goals as a freediver: is to train your mind & body to get used to these rising carbon dioxide levels and the resulting urge to breathe. This is referred to as improving your carbon dioxide threshold.
Engaging in extended apnea will eventually cause your CO2 receptors to become desensitized. The more these receptors become desensitized, the higher your carbon dioxide threshold.
One of the best ways to get used to CO2 levels rising in your body – and the resulting urge to breathe – is to recognize that it’s actually a fake signal. You’re not going to die or pass out as soon as you feel it. It is simply a warning signal that your body creates.
Your Carbon Dioxide Threshold can actually be trained up VERY quickly.
After daily practicing of some (not all) the techniques I’m about to show you, you should notice a dramatic increase in your CO2 Threshold after just 3 – 12 days of practicing.
Training exercises to boost your carbon dioxide threshold
Before we get started; let me preface this section by saying 1 thing:
First: NEVER practice any sort of underwater breath-holding exercises without a partner to watch over you. Shallow water blackout is one of the biggest killers of freedivers.
Make sure you’ve got a trained freediving buddy or instructor with you whenever training in the water for freediving.
Got your buddy with you? (or at least plan to get one? 🙂 )
Great!
Let’s take a look at the best exercises to train your Pillar 2: Carbon Dioxide Threshold.
Static Apnea with Carbon Dioxide Tables (CO2 tables)
Static apnea is, of course, training your breath-holding ability by holding your breath for set periods of time, without any movement.
Wet static apnea is always done with a partner & in the water.
You lay face down in the water while holding your breath. The water activates and trains your mammalian dive reflex, which does many things like creating peripheral vasoconstriction & lowering your heart rate, which helps you conserve oxygen and optimizes your body for diving deep underwater.
Dry static apnea is breath-hold training done on land, without movement and without supervision.
Both wet & dry static apnea can be used in conjunction with CO2 tables to boost your Carbon Dioxide Threshold.
CO2 tables work like this:
You hold your breath for a set period of time, and then decrease the amount of time you’re allowed to breathe between each set..
This causes carbon dioxide levels in your blood to progressively rise, which then forces your body to adapt it’s Carbon Dioxide Threshold.
As a general rule of thumb: Each CO2 table should only include 8 ‘sets’ of apnea & rest. Your apnea time should be about half the time of your longest breath-hold.
So if you can hold your breath for 2 minutes; your apnea time is 1 minute. (you may want to invest in a good dive computer – I recommend the Oceanic F-10 – click this link here to discover why it’s best for apnea timing).
You should always start the table with apnea (right-hand column).
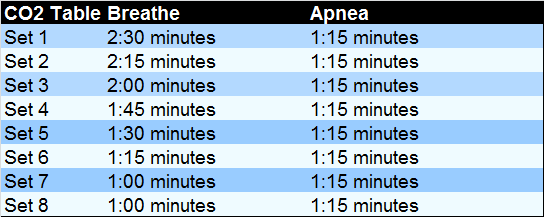
CO2 Table based on example personal best breath hold time of 2:30.
CO2 tables during static apnea should be done 2-3 times per week, doing the table once per day (8 ‘sets’). Do not practice CO2 tables on the same day as O2 tables.
Dynamic CO2 Tables
Unlike Static CO2 Tables; Dynamic CO2 Tables can be practiced while moving.
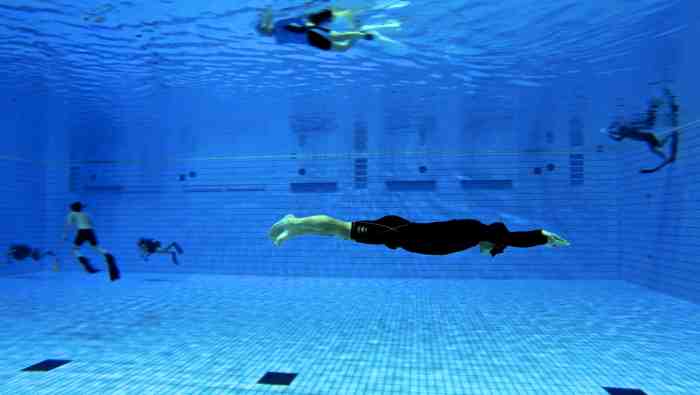
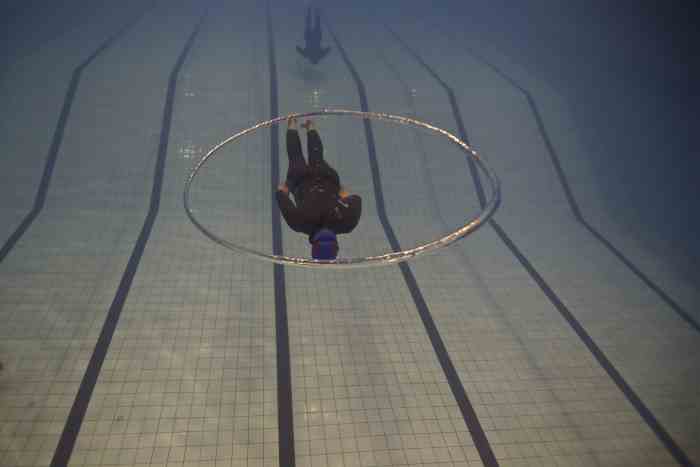
Dynamic CO2 Tables involve swimming a set distance underwater in a pool during a clearly defined period of time.
After each underwater lap, you come up and are allowed to breath for the remainder of the time allocated to each lap.
So for example in the space of 1 minute: you swim 20 meters underwater. After swimming 20 meters, you then have what’s left of that minute to rest and breathe (for example 40 seconds).
And then you repeat the above with the exact same total time, swimming distance and recovery times for 8 sets each.
In total the exercise takes 8 minutes to complete.
Also important: remember to breathe normally during your rest periods. If you breathe too much, you will flush out all the carbon dioxide, which will lower the effectiveness of the exercise.
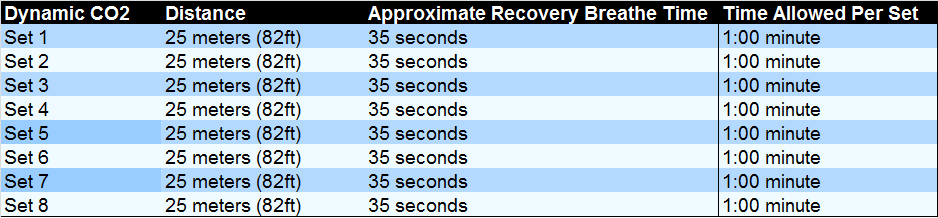
Dynamic CO2 Table example. Each distance is swam underwater, with total time allowed for swimming and recovery breathing totaling 1 minute.
The above table is based on a recommended Dynamic CO2 Table by Youtube Content Creator and Professional Freediver ‘Adam Freediver’. You can check out his Youtube Channel here for more cool freediving content.
Dynamic CO2 Tables carry two clear benefits that static CO2 tables don’t have:
1) Trains Finning Speed:
Dynamic tables help train your body and brain to know how hard to fin during apnea.
This helps you maintain a sustainable finning pace during actual freedives. Lastly Dynamic CO2 Tables also train your Carbon Dioxide Threshold.
Dynamic CO2 tables are one of the best ways to boost your carbon dioxide threshold while practicing finning.
2) Your body increases its Lactate Acid Threshold.
What is lactic acid?
Lactic acid is a compound produced in your body when your muscles don’t have enough oxygen left to produce energy, during intense physical exercise.
As a freediver you will undoubtedly have felt the effects of lactic acid, especially when finning back to the surface during your ascent.
Typically you’ll feel a burning sensation and dead, weak feeling in your abs, gluts and hamstrings/quads. All these negative effects result in slower finning, which cuts down your total freediving depth.
Dynamic CO2 tables act as a very powerful anaerobic exercise, which boosts your lactic acid threshold, for deeper, longer freedivers.
How often should Dynamic CO2 tables be done? 2 times per week. Try not to do it on the same day as other static CO2/O2 breath-hold tables. Always do Dynamic CO2 Tables under supervision.
Dry Apnea Walks
If you can’t do Dynamic CO2 tables, I recommend replacing them with Dry Apnea Walks.
Dry Apnea Walks are a form of anaerobic training – which refers to a training style where you work your muscles without fresh oxygen, usually at 80%+ your max heart rate.
The concept is similar to Dynamic CO2 tables, except you’re not finning underwater.
Instead, during Dry Apnea Walks, you hold your breath while walking a predetermined distance ABOVE the water on dry land. You then repeat it several times and you may even change the distance to make it easier/harder each ‘set’.
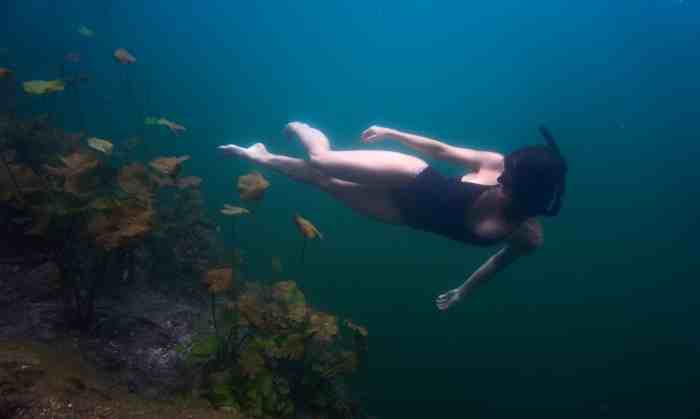
You can do apnea walks underwater as well, which are arguably slightly easier by about 15% because you activate the mammalian dive reflex. However make sure you have a dive buddy watching you.
I prefer Dry Apnea Walks as they are a lot more accessible. All you need is softish ground (like sand) in-case you pass out and hit your head. Although do keep in mind, it’s always best to have a spectator watching who can help out if needed (but it’s not necessary).
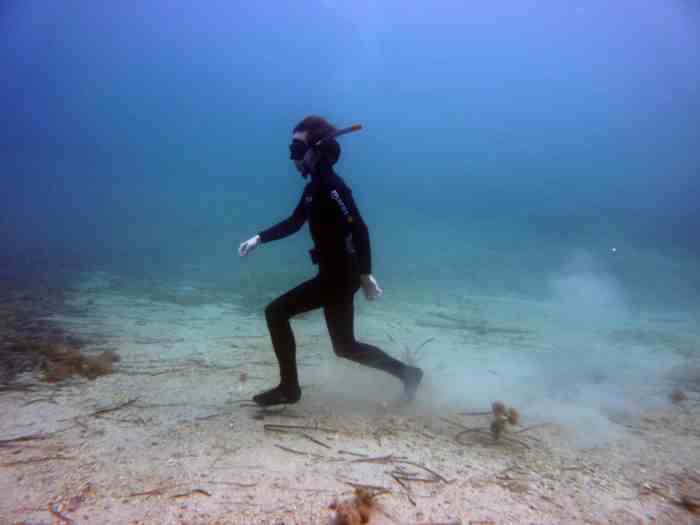
Pictured above is a WET apnea walk. I recommend doing Dry Apnea Walks (doing them on land, not underwater).
To do Dry Apnea Walks:
Step 1: Sit comfortably on a chair/bench with good posture (straight back & relaxed).
Step 2: Do your regular pre-dive breathe-up.
Step 3: After your final inhale, hold your breath in for 45 seconds to 1 minute 15 seconds.
Step 4: While holding your breath, walk a distance you feel pushes you slightly outside your comfort zone, but is still manageable. For example you may walk 15m or 25m etc depending on your skill level.
Step 5: After breathing again during your rest period, set a new preset destination or marker. This destination is dependent on how well you did in your previous apnea walk.
If it was too easy, move the marker further away. If it was too hard, bring the marker in.
Step 6: Now do 7 more ‘sets’ of each distance.
How often should Apnea walks be done? 2 – 3 times per week IF you’re NOT doing Dynamic CO2 tables.
If you are already doing dynamic CO2 tables, feel free to skip this exercise, as you are already working on your carbon dioxide threshold while boosting your lactic acid threshold.
Pillar 3 of Breath-Holding For Freediving Deeper: Boosting Hypoxic Threshold
Once you’ve trained your carbon dioxide threshold during apnea; your next step is to get your body accustomed to operating on low oxygen levels.
This is called training your Hypoxic Threshold.
Your Hypoxic Threshold is your body’s ability to operate efficiently with low oxygen levels.
Typically, hypoxic training is done by safely getting your body into a state of low oxygen, over and over again, until your body adapts to it.
After enough training your body learns to operate very efficiently even when it has low oxygen levels, which is crucial for freediving deeper.
When practiced correctly over a long period of time, hypoxic training can lead to incredibly long breath-hold times and very efficient freediving in deep depths (think 100 feet+).
Boosting your hypoxic threshold is not a sprint; it’s a marathon. You won’t be able to change it in a matter of weeks.
Hypoxic thresholds take months or even years of training to improve.
Also note: It’s always best to train your CO2 threshold first before you make a start on O2 tables. You have to work on lowering your carbon dioxide threshold first, so that you can then be comfortable enough to hold your breath long enough to experience hypoxia (and train for your body to adapt to it).
Training Exercises to Boost Your Hypoxic Threshold
Static Apnea with Oxygen Tables (O2 Tables)
The purpose of O2 tables are to force your body to learn to operate efficiently when low on oxygen.
The less oxygen your body needs in order to function; the deeper you’ll be able to freedive.
Like CO2 tables; O2 tables have 8 sets of apnea with rest time in between each apnea session.
Where O2 tables differ from CO2 tables, is that during O2 tables your rest time between each set of apnea stays the same, while your apnea time increases after each set.
Increasing the apnea time after each set, drains your body and bloodstream of oxygen, making for effective Hypoxic Training.
And remember, with O2 tables a general guideline is that the length of your last breath-hold in the O2 table, should not exceed 80% of your record apnea time.
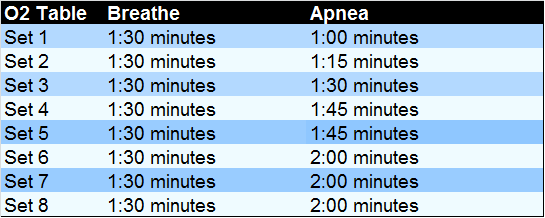
O2 Table based on example personal best breath hold time of 2:30.
Please keep in mind that no breath hold table is perfect. You will most likely have to play around with the apnea and breathing times until you find a good balance. You should aim to find a table that challenges you and is still doable.
How often should O2 Tables be done?
Aim for: 2-3 times per week. Do not practice O2 tables on the same day as CO2 tables.
The 3 Pillars of Breath-hold Training For Freediving Deeper: Final Thoughts
If you master your 3 Pillars of Breath-hold Training for deeper freediving, you’ll set yourself up for a very good shot at breaking your current freediving record and maybe even hitting 110 feet+ in your freedives a few months from now.
Just to be clear: you should not be doing every exercise on this list. For instance, there’s no need to do dry apnea walks if you’re already using an ARD and doing Dynamic CO2 Tables.
Lastly, one of the best ways to boost your breath-holding ability when freediving…is to simply freedive more often! Breath-holding exercises in real life scenarios forces your body to adapt & get better at diving deeper.
One last thing to cover for breathing for deeper diving is your pre-dive breathe-up. There’s not much point working so hard on your breath-holding thresholds if you’re not even doing the correct breathe-up!
Pre-Dive Breathe-Up Exercises For Freediving Deeper
Nailing your pre-dive breathe-up is essential for maximizing your bottom time.
The best pre-dive breathe-up, is one where you get as much oxygen into your body as possible, while remaining as relaxed as possible.
Also, remember your pre-dive breathe-up should never be done at a pace that leads to hyperventilation. Hyperventilation is VERY dangerous and should be avoided.
I’ve found the best pre-dive breathe-up is:
To exhale twice as long as the length of your inhale.
So for example if you do a 5-second inhale; you follow it up with a 10-second exhale.
And you do this for 2 minutes.
When you’re finished, you take one last breath and begin your descent.
Keep in mind this breathe-up technique is a guideline; not a hard and fast rule.
You will need to experiment and tinker a little with this breathe-up pattern until you find the perfect inhale/exhale ratio.
For example: if a 5-second inhale & 10-second exhale breathe-up leaves you feeling like you’re short on air or dizzy, try changing the times or ratio until you feel comfortable.
EG: increase your inhale. Experiment with 6 second inhales, followed by 10 second exhales.
Everyone has different tolerances to carbon dioxide and feels the urge to breathe at different times and in different ways. So keep testing until you find an inhale/exhale breathe up that leaves you feeling refreshed and ready to dive.
Always put your safety first when practicing breathe-ups.
Additional Breathe-Up Tricks
When you exhale, remember to do passive exhales:
A passive exhale is when you exhale without forcefully removing all the air in your lungs. If there’s still some air left in your lungs after each exhale and you’re feeling comfortable – then you’re likely doing your breathe-up correctly.
When you inhale: you shouldn’t be forcing air into your lungs (over-inhaling). This can lead to lung-packing which can be dangerous and should only be used by experienced freedivers who know what they’re doing.
Another interesting breathe-up hack to try is to exert a slight downward pressure each time you exhale.
Apparently this slight pressure can make the body release a little more red blood cells to give more oxygen in your blood for deeper freedives.
The Second Piece of The Puzzle For Deeper Freediving: Mindset & Relaxation
One of the single most important things to master if you want to boost your breath-holding times, is your ability to remain calm and relaxed.
Staying relaxed throughout the entirety of a breath-hold, is what separates a beginner freediver who can only hold their breath for 2 minutes…from the veterans who can jet down 110 feet+ with a breath-hold of 5 – 6 minutes or more.
Freediving is a mental game. Relaxation determines your breath-hold time & depth.
The ideal heart rate for deep freediving is below 45 bpm.
If you cannot relax your mind; your heartbeat will rise significantly above 45 bpm, causing your body to burn more oxygen than it should…
Which will kill your total bottom time and shorten your diving depths.
Also – freediving while nervous kinda defeats the whole point of it.
Freediving is about challenging yourself…
While having fun and finding peace underwater.
If you’re constantly stressed out…you’re missing out on half the fun! 🙂
Staying relaxed while freediving is one of the most important factors in freediving deeper.
Relaxation Techniques For Freediving
- Positive visualization: Research shows that consistently visualizing yourself performing well in a particular sport, will likely lead to an overall boost in your performance. My suggestion is to take 10 minutes each day to visualize yourself doing well during dives. Choose particular moments that scare you (eg: CO2 contractions) and force yourself to visualize it going well.This will rewire your brain to stay relaxed next time you actually start to panic, leading to freediving deeper.
- Meditation: An incredibly effective way to stay relaxed during deep dives, is to meditate daily. Simply find a quiet spot, close your eyes, and focus gently on your breath for 5-15 minutes. I’ve written an entire post about meditation for freediving – click this link here to read it.
- Focus on what is in your control: A very large component of staying relaxed while freediving, is to focus only on what you can control. Calm freedivers don’t bother worrying about things they have zero control over. After all, if you can’t change the outcome of something; your fate is already decided – so why bother wasting mental effort and valuable oxygen worrying about it? Same applies during deep freedives. If you’re 60 feet underwater and ascending from your dive, but worried you may not make it back up in time – as ridiculous as it sounds – don’t worry about it. You’ll only make it worse!Just do your best to get back up to the surface without panicking. Your fate is already decided and there’s nothing more you can do than try your hardest to get back up.
If you start to worry about it – you’re only shooting yourself in the foot by burning valuable oxygen.
- Listen to relaxing music before a dive: Popping in your head phones and listening to happy, positive music can cause your brain to switch gears into a more relaxed state.
You know you’re an advanced freediver when freediving deep feels like ‘coming home’ 🙂
These are just some of the relaxation techniques top freedivers use to freedive deep.
I’ve written a comprehensive post on relaxation techniques for freediving here, if you’d like to check it out.
I recommend choosing one or two of the relaxation techniques above and practicing it daily.
If you’re a complete beginner, I recommend starting with 10 minutes of meditation a day, preferably in the morning just after your wake up.
Recommended Gear For Freediving Deeper
The following gear is not necessary, but will help greatly in freediving deeper:
- Aqua Sphera X Freediving Mask: This mask has been specifically built for helping freedivers dive deeper. The lenses are narrower and closer to your face, lowering the total air volume of the mask. This results in less air being needed to equalize the mask, leaving more air in your lungs for deeper freedives. Read about it here.
- Cressi Apnea Freediving Wetsuit: This freediving wetsuit is an open-cell cut. Not only does that make it warmer, but also means the wetsuit is much thinner and less buoyant (so easier to dive deeper with). Lastly, the thin, slim cut makes it more hydrodynamic so you can fin faster for deeper freediving depths with less work. I’ve written a post comparing scuba vs freediving wetsuits. Read about it here.
- A good quality monofin: If your goal is to freedive deeper, a good quality monofin will give you much more powerful and efficient finning, jetting you down to the bottom much faster. If you’re not sure whether a monofin vs long freediving bifins is suitable for you, you can click here to read my post explaining the differences.
- Oceanic F-10 Freediving Watch: This freediving watch serves as a good safety precaution for when you’re training vigourously for deeper freediving depths. The Oceanic F-10 watch tells you your diving depths, elapsed dive times and recommended surface intervals and much more. All these features help keep you safe while you push the limits and break your record depths.
Further information to help you freedive deeper
Once you implement all the information in this post into your daily/weekly freediving training, you’ll find yourself breaking your record freediving depths in no time.
However, there are still other factors at play that can influence how deep you freedive.
Below I’ve listed some helpful resources for deeper freediving, that I didn’t have enough room to talk about in this post:
- Freediving Courses To Become A More Advanced Freediver
- Lung Packing (lung packing is not recommended, but reverse lung packing may be beneficial for you)
- Diet For Freediving
- Stretches
- Finning Techniques

Why Is Freediving So Popular?
Download our FREE eBook guide and discover why freediving is so popular and how to get started!
About the Author Gerrie van Niekerk - Apnealogy
Gerrie is a passionate Freediver, Spearfisher, Digital Marketer, and author for the Apnealogy website. Gerrie is an SSI Level 1 certified Freediver who loves geeking out about freediving and spearfishing gear and lives for his family and adventure.
